The Hostess set Simply Sketched is a very useful set. The images look great as just an outline as in the above example. For this card I stamped them in Chocolate Chip and then punched them out with the square punch. I mounted these with Chocolate Chip and attached to Very Vanilla. A strip of DSP is mounted at the bottom of the card.
The design is also good to colour. This time I used Crisp Canteloupe and applied it with a blender pen, picking up colour from an acrylic block on which I had scribbled with marker pen. I inked up the Beautifully Baroque embossing folder with Chocolate Chip. It looks quite impressive as a background.
For a different look, this time I stamped the leaves from this set in Smokey Slate. The sentiments are very useful in this set.
I used the Beautifully Baroque embossing folder again for this card. This time I used Calypso Coral. I used the blender pen technique above for this. The card base is Naturals Ivory.
I love this little bird. A little bit of colour and it makes a very quick card. The ruffled ribbon completes the card.
Stampin' Up make the best acrylic stamp blocks around. They feel great to use as they have comfortable rounded edges, they are thicker than other brands which means they are easier to grasp.
But they are also great to use as a tool to make lovely backgrounds. There are many techniques on the web that make use of the blocks but I have picked three to show you. The first uses markers to colour the block, the second uses ink pads and the third is done with re-inkers.
Technique 1- using markers on the block
Use the thicker end of marker to add each colour. Doesn't need to be exact, just rough..
Spritz the block. I find around 3 sprays from about 8 inches away. It's good to do a few samples and see the different effects with different amounts of water. See below
Top left had only a couple of light sprays. Top right had 4 good sprays. And the bottom one had 3 from about 8 inches away. Just like in the Three Bears story I think this one was 'just right'!
For the finished card I stamped the lovely tree from Thoughts and Prayers over it once dry.
Another card using the markers technique. The background on this card was made with the Stampin' Up Block E. Markers were scribbled on the block in rough sections. - Raspberry Ripple, Primrose Petals, Summer Starfruit and Gumball Green. The block was then sprayed with a Stampin' Spritzer filled with water. Just use enough water to bead the water on the block. Press the block down firmly until you see the ink transfer from the block to the card. If you are using Whisper white or Vanilla you will see a 'cracking effect' on the card which shows the ink has transferred. The block should be virtually clean when you take it off the card.
Same colours as above but a different result. This is what I love about this technique- every card is different. Fabulous Florets was stamped with Gumball Green. The clay was coloured with re inker before pressing out in the blossom mould.
Ink pads are another way to create a background with the blocks. A simple background can be achieved with just one colour.
This is not one of my cards but it is a lovely example of the technique using just one colour. It is from
Experiment with different amounts of water to give very different effects.
I used So Saffron and Soft Suede and Chocolate Chip on this card. This time I didn't use as much spray and it produced a more mottled irregular effect. Once it was dry I stamped over the background with this stamp from Serene Silhouettes in Chocolate Chip.
What a lovely card from Sylvia Shirec. It uses 2 blocks of different shapes and sizes.
This time I used more water so the result is much more evenly covered and the colours have run together as well. I did have some issues with the card buckling with the extra water and I had to make sure it was firmly attached to the card base. Watercolour paper would be better in terms of not buckling but I don't like the colour if you are leaving a border.
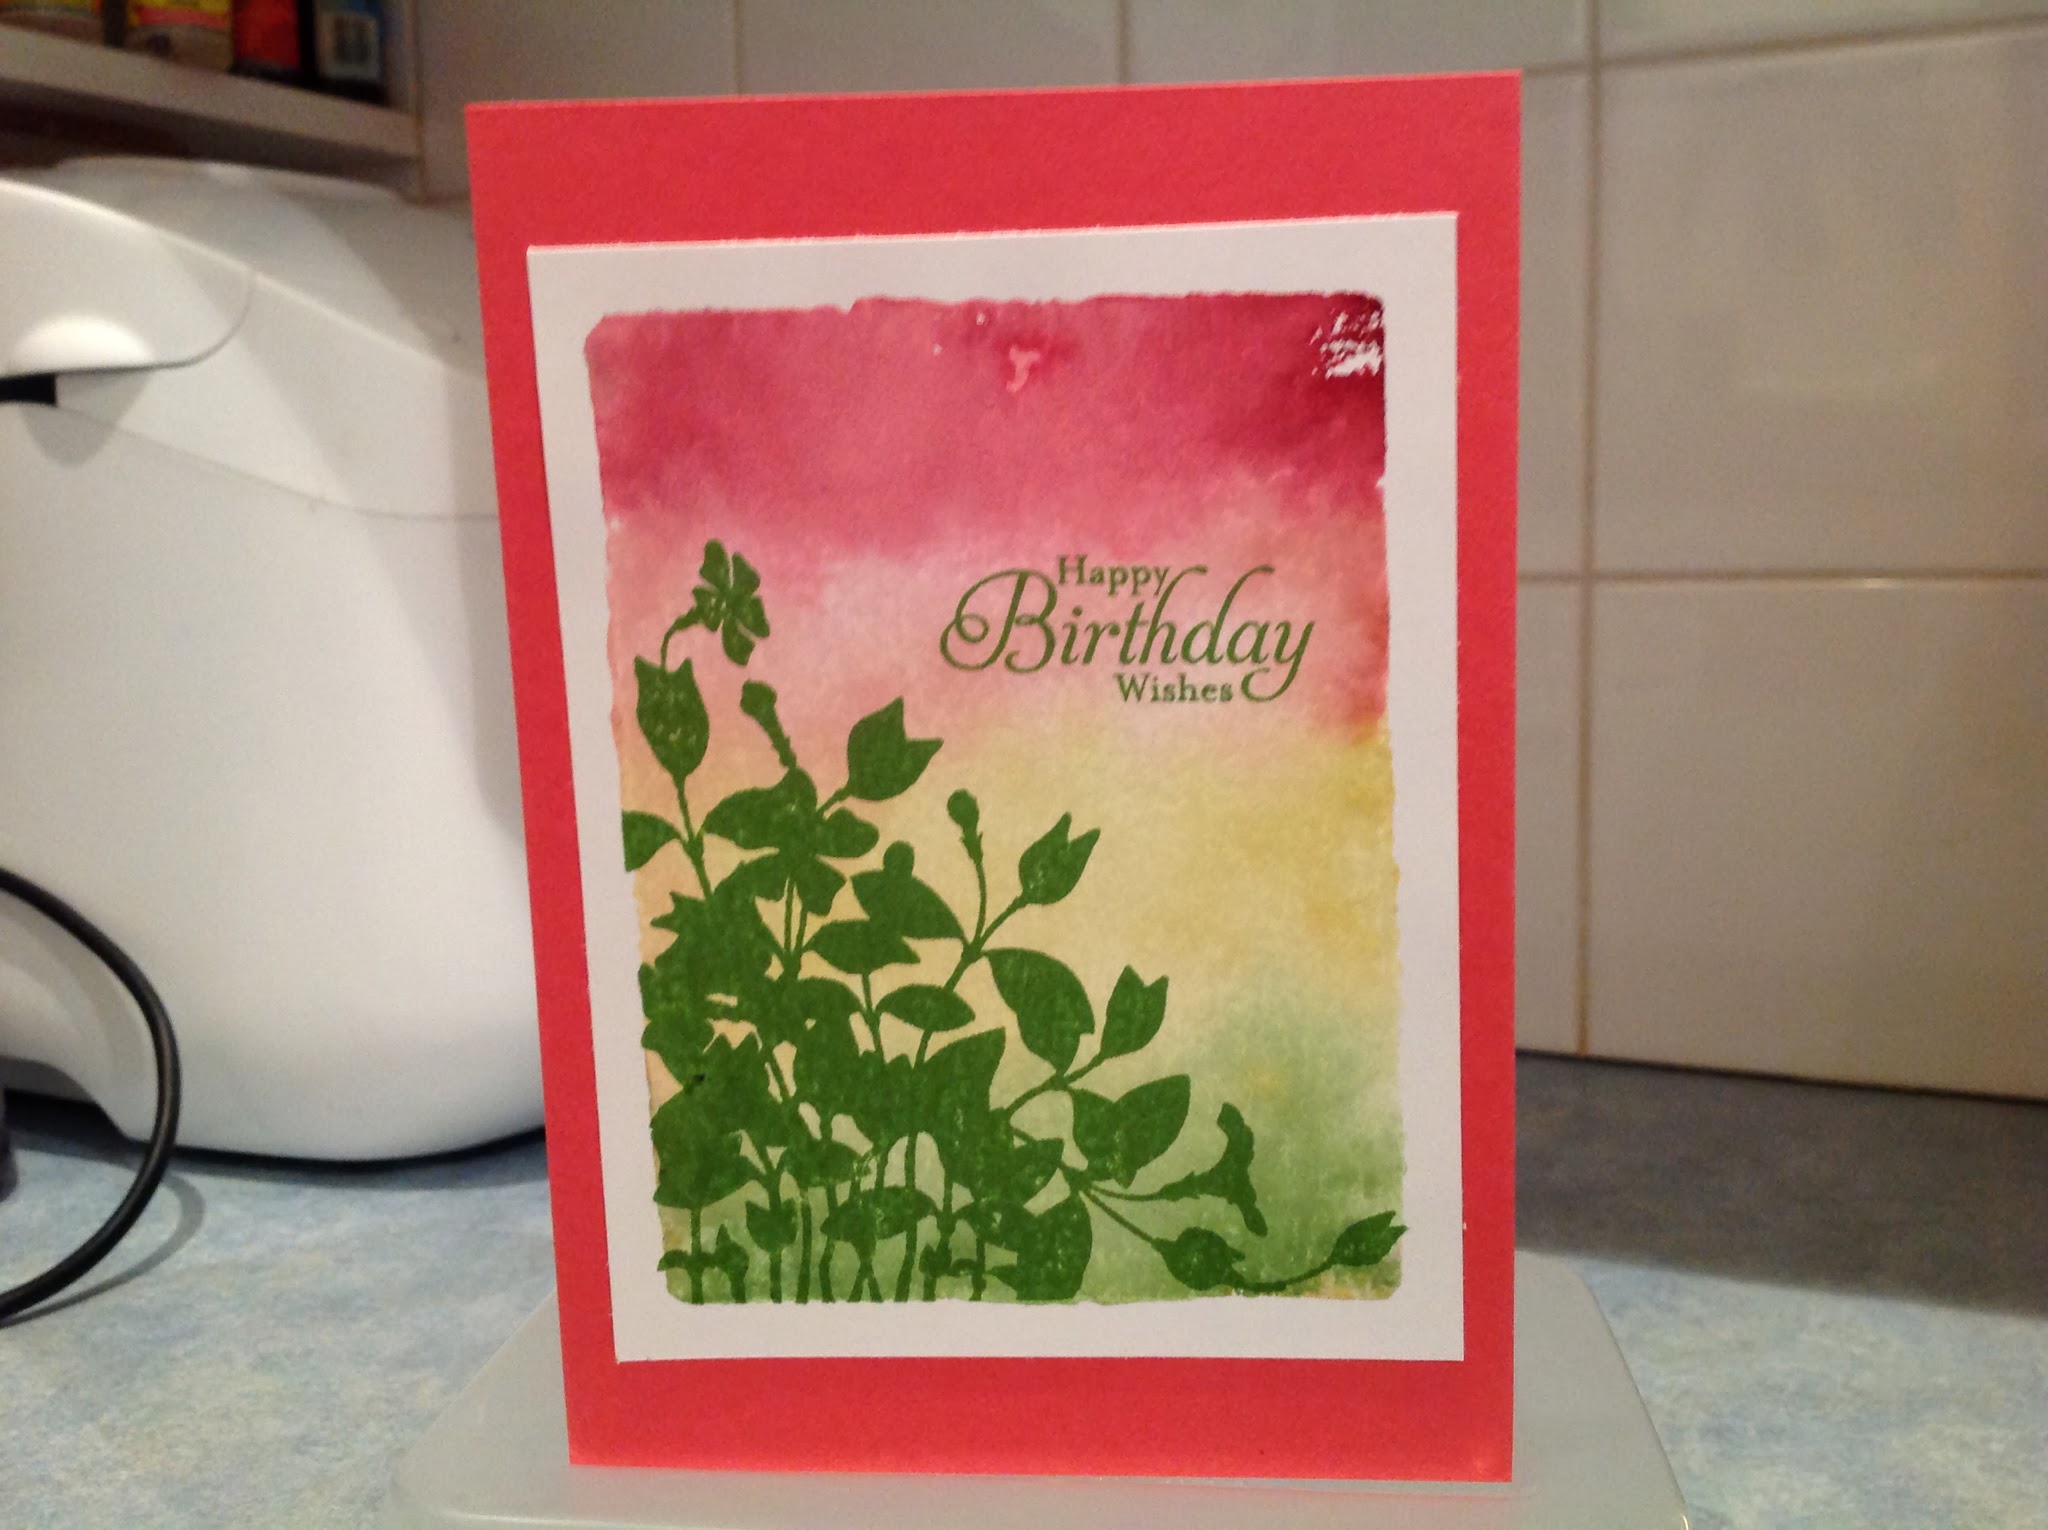
This time I used So Saffron, Soft Suede and Chocolate Chip. The old but favourite set Lovely as a Tree always looks great. It has such fine detail. I hope they never retire it or there will be a riot with Stampin' Up demonstrators!
I used block I for this one. I found the Naturals Ivory cardstock worked well with this technique as it is thicker and therefore handles the water better. I used Crumb Cake ( I know it looks darker than that) and the result was great as it turned out strong but with different variations within the colour.
Soft Suede and Pool Party. Not quite as much water this time
My favourites however are below. They were based on a card by Lynne Fahey.
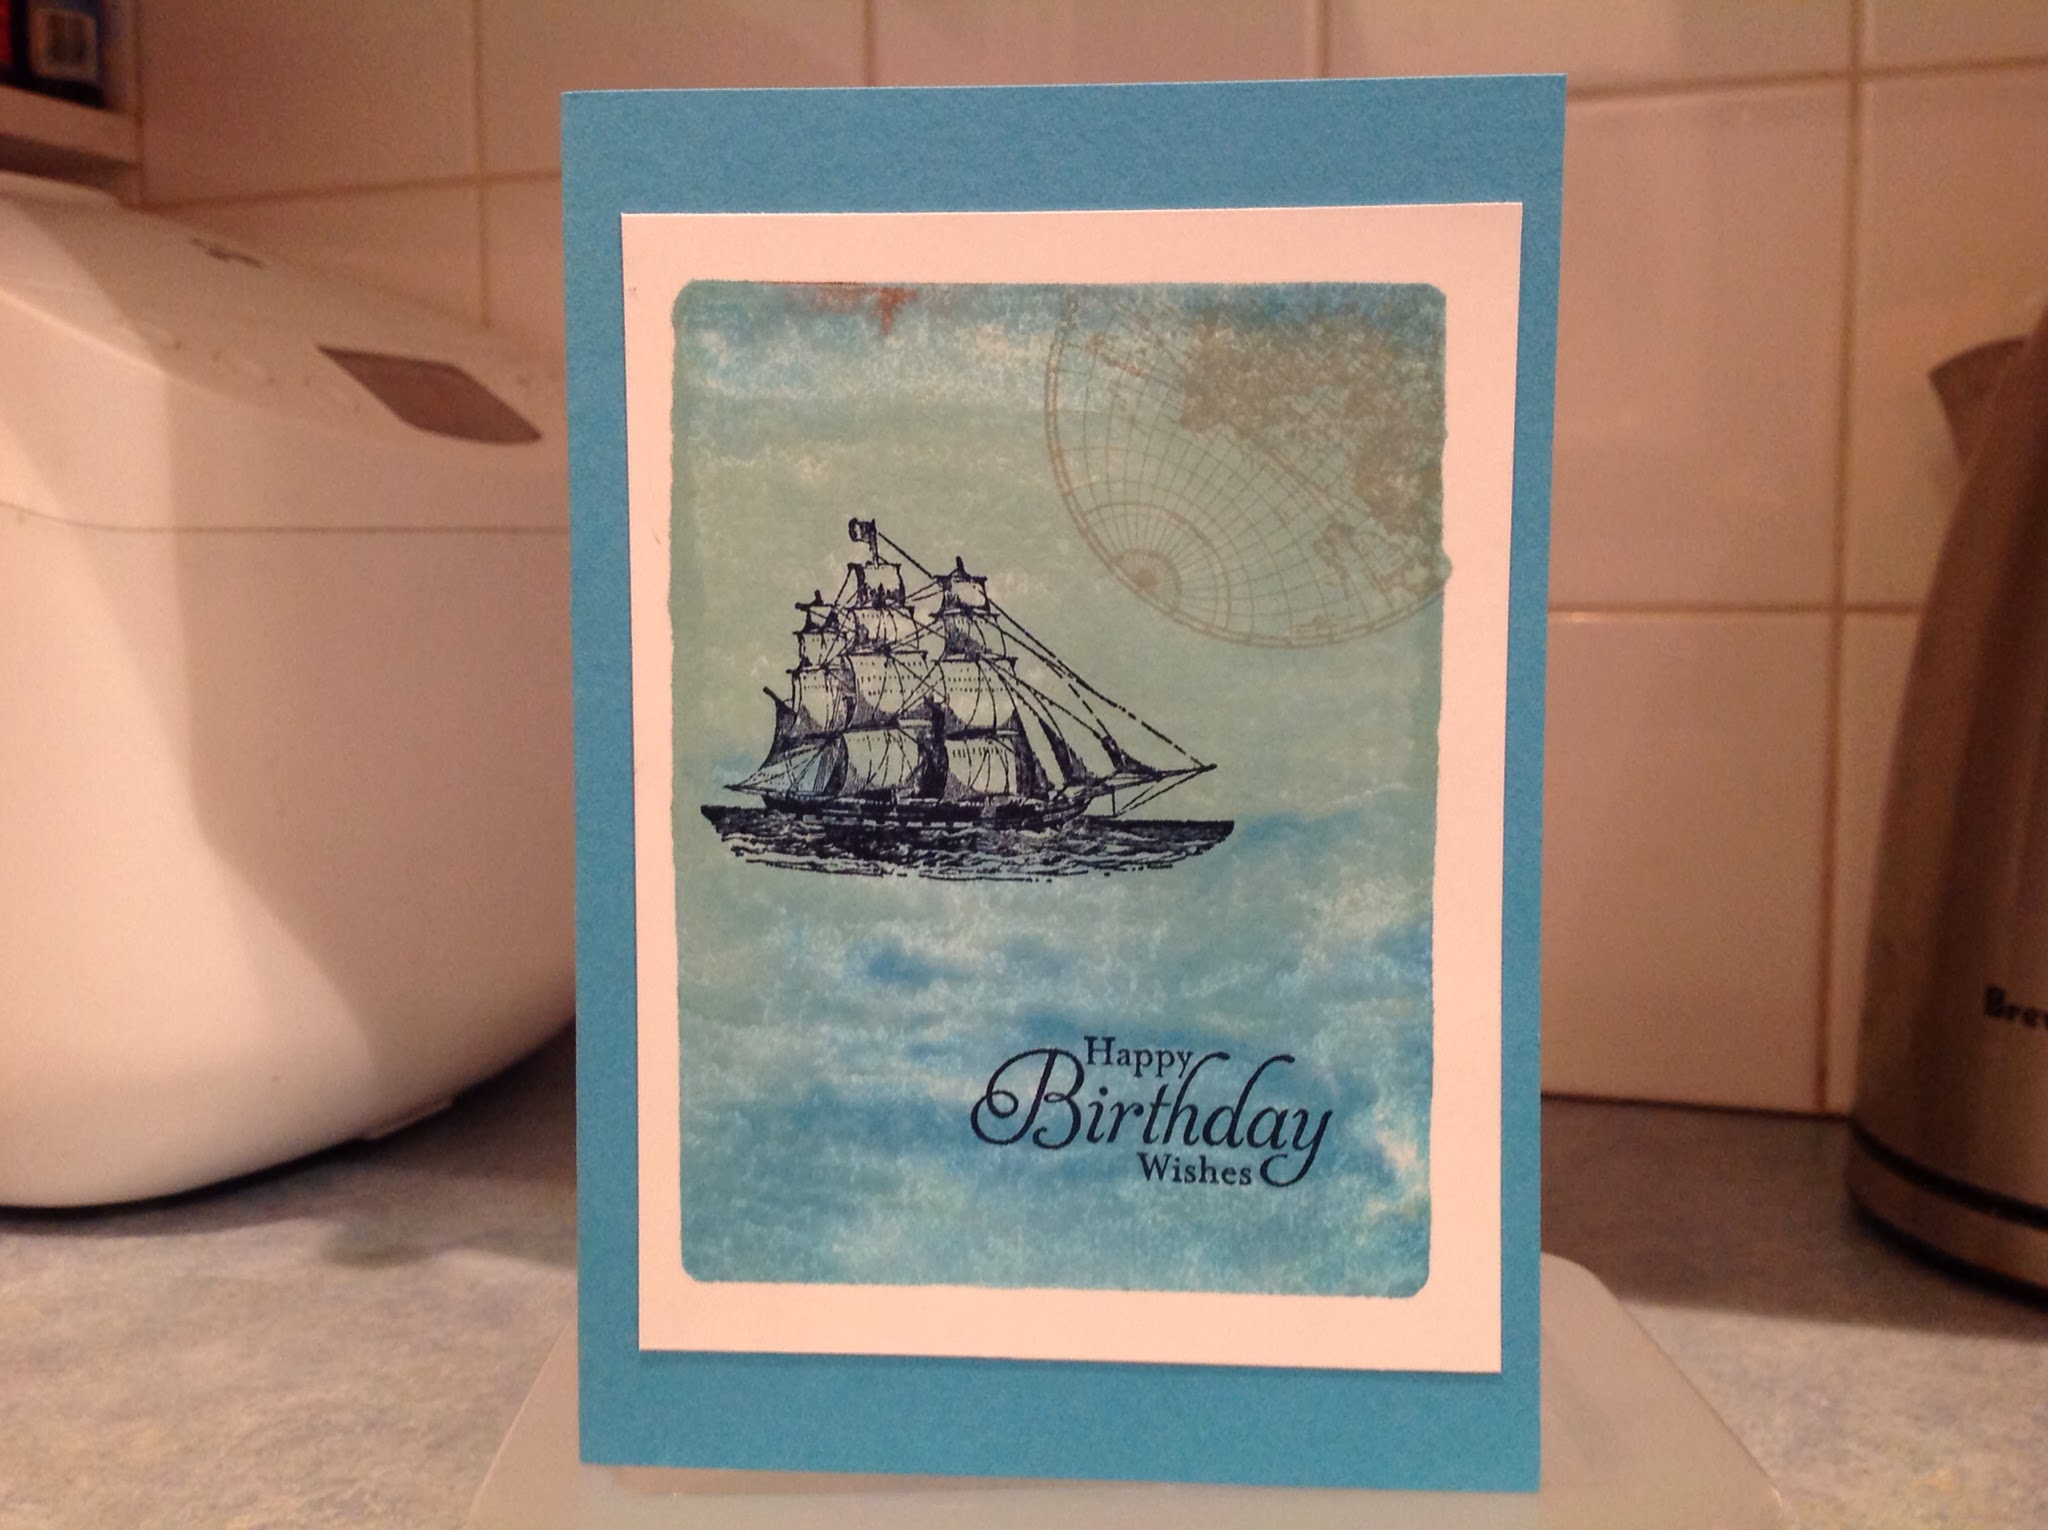
This one used Tempting Turquoise and Pool Party re-inkers. This 3rd technique is simple. I dropped a few drops of each colour onto the block and swirled them around a little. I then sprayed it with the mister. Once dry I stamped the ship from Open Sea in Midnight Muse and the sentiment from Simply Sketched. This hostess set has 3 wonderful sentiment stamps which are very useful. In the corner I stamped the world stamp from this set in Sahara Sand.
Same stamps but this time I used Midnight Muse and Pool Party. I love how this looks on Very Vanilla mounted onto Midnight Muse card base. Island Indigo Bakers Twine finishes off the card. It looks good mounted onto Pool Party.
Check out this Video on these different techniques.
Hope you have fun with this technique. The sky is the limit with what you can do with it!