Thursday 23 January 2014

Mini albums

One of the things I love doing is making mini albums. Actually it is a love -hate relationship ...I love the result but I always seem to pick a time to do one where there is time deficit so it ends up being a stressful rather than enjoyable experience.


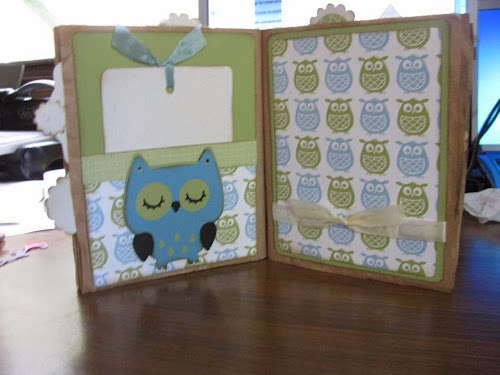
I thought I would share this one which I did for a baby shower gift. I used the brown paper that Stampin' Up uses to pack the orders to make the book itself. I hate throwing it out. Teneale Williams showed some different ways of using this brown paper at a Stampin' Up event a few years ago and a mini album was one of them

All you do is to break off the number of double sheets you want. Every 2 sheets has a perforation so it's easy to break them into 2 sheet sections. Smooth them out slightly. I like the wrinkles but if this worried you you can iron the paper. Each page has an open side that can be used as a pocket. You can use these to put things in such as pull out tags for more photos or can be used for journaling. If you don't want to use these as pockets then you can simply close them off with Snail adhesive.


Line up the sheets so they are even. I used 6 double sheets for this mini album. Make sure the sheets are all facing the same way. Then fold over the spine side of the book and In this one I fastened it with 2 clips.


The first pages were to record the photos so far- the parents the day they told the family, the ultrasound and a page to record the Baby shower.
 
 
Each double page contains a blank page to attach photos later and a tag for journaling that can be pulled from the pocket. I used Stampin' Up designer paper and card, some punches and my Cricut for each page.


We didn't know the sex of the baby so I used fairly neutral colours


I made this card for a friend who had given birth prematurely. Friends gave her a baby shower after the baby was born and I thought this card might be an encouragement that she would soon have her baby home.


The mini album is a great way to pre make a scrapbook as a gift so that it is quick for them to just pop the photos in later and record the event.


So why not give the mini album a go? If you want a quicker option there is a mini album kit that looks great in the new Occasions catalogue coming out in a few days.


Wednesday 22 January 2014

How to video

I was a bit unsure how to attach the labels to the Stampin' Up stamps when I first switched over to clear stamps.

So I thought this quick video might be of assistance to demonstrate the process.


How to video

I was a bit unsure how to attach the labels to the Stampin' Up stamps when I first switched over to clear stamps.

So I thought this quick video might be of assistance to demonstrate the process.


Sweet Gift Challenge

I struggle with using small stamps as I find they often looked swamped on a card. Consequently I have had this set for a while and have lacked the enthusiasm to use it. Sad state of affairs!

But now I have made a deal with myself not to buy anymore stamps until I have made a reasonable amount of successful cards with the sets still not opened. So here goes!


I started with using the stork stamp to create a couple of background. This first one was embossed in clear and then brayered with Crisp Canteloupe. Brayering tends to make colour darker than sponging I find. Also the finer details in the storks wings seem to less pronounced. I guess the sponge gets into tiny spaces better? I love the bit where you wipe over the design with a tissue and the embossed image pops out. Cool!
A strip of Chocolate Chip card embossed with dots and matted on White was added and the large sentiment from this set was cut using the Ovals Collection dies. Love these Stampin Up dies.


This time I sponged Pistachio Pudding and crushed curry. It looked a little bare so I stamped the Distressed dots background stamp in Soft suede over it after stamping it off once to make it lighter. The card base is Soft Suede.


I cased this from Michelle Zindorf at http://zindorf.blogs.splitcoaststampers.com/tag/stampin-up-stamps/
I like hers better. Think I might try it again once I get my fringe scissors I have been eyeing off in the new Occasions catalogue. Some grass at the bottom might be a fun addition.
Anyway I stamped the clouds by sponging a few times around a scalloped circle that I had punched out. Move the scallop and re- do where you want the next cloud.


I think the reason I don't like to use small stamps is that I don't like the look of small elements spaced out over the card. So I experimented with clustering the image and the sentiment and I think that works much better. This card was Gumball Green and Strawberry Slush.


Same principle. This time I used Raspberry Ripple and Very Vanilla.


Very Vanilla again for the card front, mounted on Island Indigo.


I love this new Crushed curry colour but haven't used it much yet. It goes very well with Bermuda Bay. I used some Crushed Curry Chevron ribbon over the embossed Delicate Designs.


I thought repetition of the image as a border was quite effective. This time Crushed Curry, Bermuda bay and Strawberry Slush make the eye catching combo.


It liked the monotone look of this card. I simply stamped the 3 images in Midnight muse and then cut each square the same size. I think it was 4.5 square. I then matted them on the Midnight Muse Matt and then onto the square card. I usually make my square cards 12.5cm x 12.5 cm the best size as they can be sent with normal postage and you can easily get the right size envelopes.


Bermuda Bay again with Strawberry Slush and cut with an oval die and then matted on a Square lattice embossed piece.


I have been quite taken with Bermuda Bay and Strawberry Slush as a combination haven't I? This time I used the storks as a motif for the border.


Bermuda Bay and Crushed Curry. I inked up the stamp using markers so I could make it multi coloured. I used a strip of Crushed Curry Chevron ribbon and a strip embossed with a folder from the Needlepoint collection.


Well I feel quite sated now with this set. What to move onto next.......

Don't forget to visit my online store if you want something.

Hope you are having some quality stamping time!


Saturday 18 January 2014

In love with Venetian Romance designer Paper

I am not a big fan of using Designer papers usually. I am never quite sure what to do with it and often end up taking it off and using plain card. but this Venetian Romance kept beckoning however and I am so glad I listened. The colours are very soft and have variations in intensity.


This is a birthday card for a special someone. The DSP made it a quick card. I used up a scrap of lace with a strip of the base card colour which is Natural White. The sentiment is from Sassy Saluations and is stamped and then cut with the Window frame collection of dies. The Matt is Pistachio Pudding.


Delicate Designs embossing folder features on this simple card. I used the the Labels Collection of dies in this card. I really like the sentiment matted with the same colour card. I sponged both with a little Soft Suede.


Love these papers. So elegant. The Needlepoint Border embossing folder was used in Naturals Ivory card under the contrast strip of DSP.


I never used this old Stampin Up set of sentiments much as I found it almost impossible to get the images to stamp properly using the old ink pads. I dug them out and wow what a difference with the new pads. Stamped perfectly every time. I will certainly be using these again as the sentiments are really appropriate.


I did this just to use up some odd strips of the DSP as I didn't want to waste it. I think the split matt very much adds to the impact of the card and I ended up using this technique on several other cards.


A birthday card for a another certain special person. I pulled out my Cricut to cut the images. I realised that I haven't used this machine at all last year as I have been spending all my craft time stamping. I had trouble even remembering how to use it. Thankfully it came back to me!


Another Cricut creation. Stampin Up materials of course!! A birthday card for a very special little girl.


Venetian Romance paper. Cricut again for the lovely tree.


Cricut meets Stampin Up again. This one uses Naturals White card matted onto Pistachio Pudding. The lower matt is embossed with the Beautully Baroque embossing folder.


I had a few strips of DSP left over so just stuck them on the lower part of this card. The Crisp Cantaloupe stretch ruffled ribbon finishes it off nicely.


Isn't this DSP just lovely? It is so subtle with the variations of colour depth.


Found this stamp while looking through my stash. Haven't used it much so thought I should make a card with it suitable for a male.


Well I guess I need to move onto something else now so will put Venetian Romance to bed! Happy stamping!